# canvas绘制环形进度条
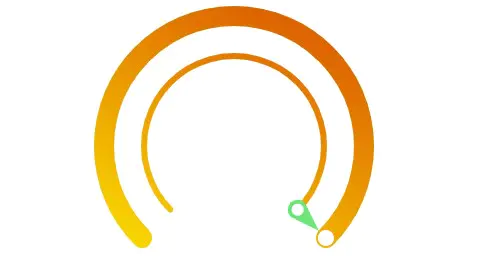
最近公司让做一个页面,上面有几个图表,柱状图饼状图之类的,之前都是使用echarts插件来进行渲染的,但下面这个环形的进度条没有找到太适合的插件,不知道echarts能不能修改成这样的。之前用canvas画过滚动条,嘿嘿,那这个就用canvas画布试试。

参考链接: canvas实现渐变色环形进度条 (opens new window)
这种圆环进度条是一个大圆环和一个小圆环,然后大圆环有底部背景圆环和上面可进行滚动的圆环,和上面的白色按钮,小圆环又可以分上下两部分和最上面的指针,这样我们根据这些可以一步一步的使用canvas来画图。
<canvas id="canvas" width="300" height="300"></canvas>
// 获取canvas元素 let canvas = document.getElementById('canvas');
let ctx = canvas.getContext("2d");
let width = canvas.width;
let height = canvas.height;
# 一、先画一个圆环
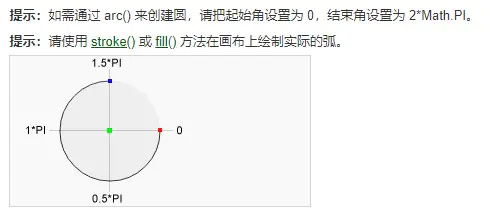
使用canvas arc()方法 content.arc(x, y, radius, startAngle, endAngle, anticlockwise)

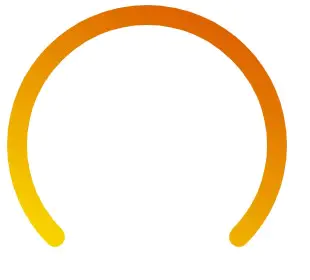
通过控制开始角(startAngle)和结束角(endAngle)就可以画任意的环形, 从0开始到 1 PI就是半圆,2PI就是整个圆。这样我们就很方便的画出朝下的环形了,我们可以把开始角设为 0.75PI 结束角设为2.25PI,或者你也可以如上图一样通过rotate()方法旋转朝下,记得把圆心设为中心点。
draw();
// 绘制圆环
function draw() {
  let circleObj = {
    ctx: ctx,
    /*圆心*/
    x: width / 2,
    y: height / 2,
    /*半径*/
    radius: width / 2 - 20,
    //半径比canvas宽的一半要小
    /*环的宽度*/
    lineWidth: 20
  };
  circleObj.color = '#ccc';
  circleObj.startAngle = Math.PI * 0.75;
  circleObj.endAngle = Math.PI * 2 + Math.PI * 0.25;
  drawCircle(circleObj);
}
function drawCircle(circleObj) {
  let ctx = circleObj.ctx;
  ctx.beginPath();
  ctx.arc(circleObj.x, circleObj.y, circleObj.radius, circleObj.startAngle, circleObj.endAngle);
  //设定曲线粗细度
  ctx.lineWidth = circleObj.lineWidth;
  //给曲线着色
  ctx.strokeStyle = circleObj.color;
  //连接处样式
  ctx.lineCap = 'round';
  //给环着色
  ctx.stroke();
  ctx.closePath();
}
# 二、绘制圆环渐变色
使用 canvas createLinearGradient(x1, y1, x2, x2) 方法给圆环添加渐变色
x1,y1开始坐标,x2,y2结束坐标 和 gradient.addColorStop(stop,color) 配合使用
let grd = ctx.createLinearGradient(width / 2, 0, 0, height);
grd.addColorStop(0, "#dd6200");
grd.addColorStop(1, "#fff400");
circleObj.color = grd;

# 三、绘制上层运动的圆环
通过定时器或者 requestAnimationFrame 对象来使圆环的结束角endAngle不停的自增来使圆环跑起来。
let defaultAngle = Math.PI * 0.75;
animate();
// 逐帧动画
function animate() {
  defaultAngle += 0.05;
  // 这个值可以根据个人需要修改
  // 这个maxAngle 时上层圆环滚动的到最大的角度可以传入这个角度来控制滚动的百分比
  let maxAngle = Math.PI * 2 + Math.PI * 0.25;
  if (defaultAngle >= maxAngle ) {
    defaultAngle = maxAngle ;
    draw(); // 绘制圆环
    return
  }
  draw(); // 绘制圆环
  window.requestAnimationFrame(animate);
}
// 绘制圆环
function draw() {
  // 为了避免每次绘制的时候出现一些奇奇怪怪的问题,比如拖影之类的,每次绘制之前清空一次绘布
  ctx.clearRect(0, 0, width, height);
  let circleObj = {
    ctx: ctx,
    /*圆心*/
    x: width / 2,
    y: height / 2,
    /*半径*/
    radius: width / 2 - 20,//半径比canvas宽的一半要小
    /*环的宽度*/
    lineWidth: 20
  };
  // 绘制背景
  circleObj.color = '#eee';
  circleObj.startAngle = Math.PI * 0.75;
  circleObj.endAngle = Math.PI * 2 + Math.PI * 0.25;
  drawCircle(circleObj);
  // 绘制运动环
  circleObj.startAngle = Math.PI * 0.75;
  circleObj.endAngle = defaultAngle;
  // 背景渐变
  let grd = ctx.createLinearGradient(width / 2, 0, 0, height);
  grd.addColorStop(0, "#dd6200");
  grd.addColorStop(1, "#fff400");
  circleObj.color = grd;
  drawCircle(circleObj);
}
function drawCircle(circleObj) {
  let ctx = circleObj.ctx;
  ctx.beginPath();
  ctx.arc(circleObj.x, circleObj.y, circleObj.radius, circleObj.startAngle, circleObj.endAngle);
  //设定曲线粗细度
  ctx.lineWidth = circleObj.lineWidth;
  //给曲线着色
  ctx.strokeStyle = circleObj.color;
  //连接处样式
  ctx.lineCap = 'round';
  //给环着色
  ctx.stroke();
  ctx.closePath();
}
# 四、绘制运动圆环上的白色按钮
上层圆环是根据角度增加来跟着运动的,那白色的圆点也来做同步运动呢,我们已经知道圆环每次运动的角度数,那就跟着这个角度来同步就是。有两种方法一种是通过 canvas rotate()方法以原点为原点进行旋转,圆环运动多少就旋转多少,可以达到同步。二是使用Math 三角函数的正弦/余弦 和 半径来计算出每次运动角度数对应的 坐标 值,来更新白死圆点的位置。
这里我们使用第一种方法,通过rotate旋转来同步,那么白色圆点的位置就是到原点的位置也就是外环的半径
注意:旋转的中心是原点,你使用的x,y坐标都是到原点的坐标,不是到画布 0, 0的坐标。
// 绘制最上面的指针
function circlingPointer(){
  let radius = height / 2 - 60;
  ctx.save(); //保存之前的状态
  // 设置旋转原点为中心点
  ctx.translate(width / 2, height / 2);//原点移动到画布中央
  ctx.rotate(defaultAngle);//根据角度改变来旋转白色圆点
  // 白色圆点
  ctx.beginPath()
  ctx.arc(width / 2 - 20, 0, 8, 0, 2 * Math.PI, false)
  ctx.fillStyle="#fff"
  ctx.fill()
  ctx.closePath()
  ctx.restore();//回到未改变坐标的状态
}
// 和draw方法一样放在animate就可以
# 五、绘制内环上的指针
通过画线和画圆两种方法来画一个指针, 用圆的开始角和结束角来调整圆的方向。
// 绘制最上面的指针
function circlingPointer(){
  let radius = height / 2 - 60;
  ctx.save(); //保存之前的状态
  ctx.translate(width / 2, height / 2);
  //原点移动到画布中央
  ctx.rotate(defaultAngle);//根据角度改变来旋转白色圆点
  // 通过lineTo()和arc方法绘制内环的指针
  ctx.beginPath()
  ctx.moveTo(radius, -10)
  ctx.lineTo(radius + 30, 0)
  ctx.arc(radius, 0, 10, Math.PI * 0.5, Math.PI * 1.5, false)
  ctx.lineTo(radius, 10)
  ctx.fillStyle='#6de57a'
  ctx.fill()
  ctx.closePath()
  ctx.restore();//回到未改变坐标的状态
}
注意: 在手机上使用canvas时会出现画布模糊的情况,可以把画布的width和宽设置为样式的两倍。
现在整个大致的步骤就这些了,把这些步骤合在一起就能实现上面的圆环进度条了。

如下是整个代码:
<canvas id="canvas" width="300" height="300"></canvas>
<script>
 // 获取canvas元素
 let canvas = document.getElementById('canvas');
 let ctx = canvas.getContext("2d");
 let width = canvas.width;
 let height = canvas.height;

 // defaultAngle 设置可滚动圆环的起始角度,通过requestAnimationFrame函数一点一点的递增来使圆环跑起来,
 // 也可以使用setTimeout()
 // 与圆环的起始角度相同
 let defaultAngle = Math.PI * 0.75;

 animate();
 // 逐帧动画
 function animate() {
   defaultAngle += 0.05;
   // 这个值可以根据个人需要修改
   // 这个maxAngle 时上层圆环滚动的到最大的角度可以传入这个角度来控制滚动的百分比
   let maxAngle = Math.PI * 2 + Math.PI * 0.25;
   if (defaultAngle >= maxAngle ) {
     defaultAngle = maxAngle ;
     draw(); // 绘制圆环
     circlingPointer() // 绘制最上面的指针
     return
   }
   draw(); // 绘制圆环
   circlingPointer() // 绘制最上面的指针
   window.requestAnimationFrame(animate);
 }
  // 绘制圆环
  function draw() {
    // 为了避免每次绘制的时候出现一些奇奇怪怪的问题,比如拖影之类的,每次绘制之前清空一次绘布
    ctx.clearRect(0, 0, width, height);
    // 外环
    let circleObj = {
      ctx: ctx,
      /*圆心*/
      x: width / 2,
      y: height / 2,
      /*半径*/
      radius: width / 2 - 20, //半径比canvas宽的一半要小
      /*环的宽度*/
      lineWidth: 20
    };
    // 内环
    let smallCircle = {
      ctx: ctx,
      x: width / 2,
      y: height / 2,
      radius: width / 2 - 60,
      lineWidth: 6,
      color: '#eee',
      startAngle: 0,
      endAngle: Math.PI * 2
    };

    // 绘制内环背景
    drawCircle(smallCircle);
    // 绘制内环 根据defaultAngle的角度变化而滚动
    smallCircle.startAngle = Math.PI * 0.75;
    smallCircle.endAngle = defaultAngle;
    // 使用ctx.createLinearGradient来为圆填充渐变色
    let smallGrd = ctx.createLinearGradient(width / 2, 0, 0, height);
    smallGrd.addColorStop(0, "#dd6200");
    smallGrd.addColorStop(1, "#fff400");
    smallCircle.color = smallGrd;
    drawCircle(smallCircle);
    // 绘制外环背景
    let bgrd = ctx.createLinearGradient(width / 2, 0, 0, height);
    bgrd.addColorStop(0, "#95ea5c");
    bgrd.addColorStop(1, "#f8d6c1");
    circleObj.color = bgrd;
    circleObj.startAngle = Math.PI * 0.75;
    circleObj.endAngle = Math.PI * 2 + Math.PI * 0.25;
    drawCircle(circleObj);
    // 绘制外环
    circleObj.startAngle = Math.PI * 0.75;
    circleObj.endAngle = defaultAngle;

    let grd = ctx.createLinearGradient(width / 2, 0, 0, height);
    grd.addColorStop(0, "#dd6200");
    grd.addColorStop(1, "#fff400");
    circleObj.color = grd;
    drawCircle(circleObj);
  }
  // 绘制最上面的指针
  function circlingPointer(){
    let radius = height / 2 - 60;
    ctx.save(); //保存之前的状态
    ctx.translate(width / 2, height / 2);//原点移动到画布中央
    ctx.rotate(defaultAngle);//根据角度改变来旋转白色圆点
    // 通过lineTo()和arc方法绘制内环的指针
    ctx.beginPath();
    ctx.moveTo(radius, -10);
    ctx.lineTo(radius + 30, 0);
    ctx.arc(radius, 0, 10, Math.PI * 0.5, Math.PI * 1.5, false);
    ctx.lineTo(radius, 10);
    ctx.fillStyle='#6de57a';
    ctx.fill();
    ctx.closePath();
    // 绘制内环指针上的圆点
    ctx.beginPath();
    ctx.arc(radius, 0, 6, 0, Math.PI * 2, false);
    ctx.fillStyle='#fff';
    ctx.fill();
    ctx.closePath();

    // 绘制外环白色圆点
    ctx.beginPath();
    ctx.arc(width / 2 - 20, 0, 8, 0, 2 * Math.PI, false);
    ctx.fillStyle="#fff";
    ctx.fill();
    ctx.closePath();
    ctx.restore();//回到未改变坐标的状态
  }
  function drawCircle(circleObj) {
    let ctx = circleObj.ctx;
    ctx.beginPath();
    ctx.arc(circleObj.x, circleObj.y, circleObj.radius, circleObj.startAngle, circleObj.endAngle);
    //设定曲线粗细度
    ctx.lineWidth = circleObj.lineWidth;
    //给曲线着色
    ctx.strokeStyle = circleObj.color;
    //连接处样式
    ctx.lineCap = 'round';
    //给环着色
    ctx.stroke();
    ctx.closePath();
  }

  // 另一种使用三角函数进行旋转
 function circlingMotion(){
    let radius = width / 2 - 20;
    ctx.save();
    ctx.translate(0, 0);
    x = width / 2 + Math.cos(defaultAngle) * radius;//确定坐标(此处圆心即是原点)
    y = height / 2 + Math.sin(defaultAngle) * radius;//确定坐标(此处圆心即是原点)
    ctx.beginPath();
    ctx.arc(x, y, 8, 0, 2 * Math.PI, true);//绘画做圆周运动的圆
    ctx.fillStyle="#fff";
    ctx.fill();
    ctx.closePath();
    ctx.restore();
  }
</script>
← canvas文档 canvas实现手写签名 →